Otherwise Known as Mom’s Kukietka Bread
For we mortals, food is one of those things that can speak to our soul. We all have those certain smells that loft us over precious moments and teleport us to times when life truly was idyllic. Nothing brings back the magic of childhood and the wonderful memories of Easter for me than the smell of Mom’s Polish Egg Bread baking in the oven, unless it’s Dad whipping up his Easter borsch that I was forced to eat in disgust as a kid but now look forward to.
If you too have a soul moving moment when you smell homemade bread in the oven and if you want to follow your bliss to ecstasy, then after this bread comes out of the oven, slice it while still warm and lay down a light base of butter schmeared with fruit preserve. For me it’s gotta be strawberry, but raspberry will do in a pinch. Then, and this is the crucial step, cut the bread into equal quarters and let the huge internal struggle begin regarding which square should be eaten first.
Post Easter Bliss: An equally good way to appreciate Mom’s homemade bread, is with a cold ham and mustard sandwich. If you’re feeling extra adventurous, substitute the mustard for horseradish sauce and garnish with a Polish gherkin.
Ingredients for Mom’s Homemade Bread
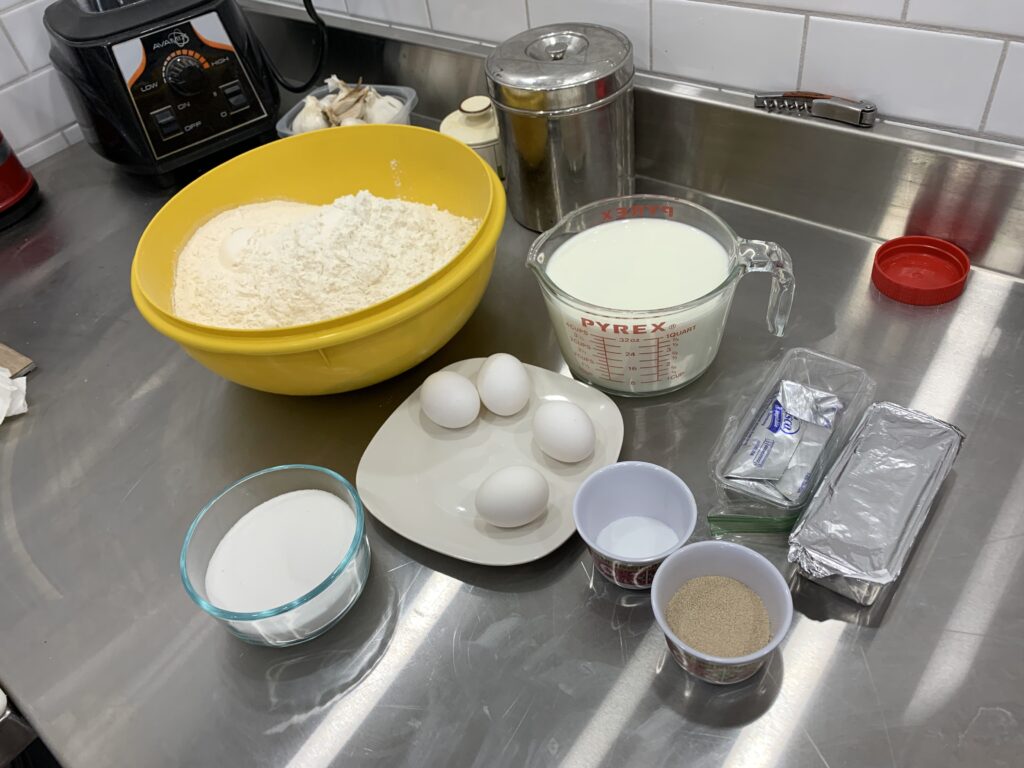
- 1,065 g (7.5 cups) flour – sifted
- 500 g (2 cups) lukewarm whole milk
- 110 g (1/2) cup sugar
- 95 g (1/2 cup) shortening – softened
- 17 g (4.5 tsp) dry yeast or 2 cakes of fresh yeast (
- 14 g (2 tsp) salt
- 2 eggs
- 1 cup raisins (optional)
Process
- Mise en Place – measure and prepare your ingredients prior to starting
- Mix warm milk, sugar and salt together. Stir in yeast until dissolved. Try not to over stir, you’re going to ask a lot from these microbes so shouldn’t abuse them right out of the gate.
- Sugar kick starts the yeast. Salt referees to ensure the yeasts doesn’t go Rambo on you – in the post-COVID era, we’d call salt a mitigation measure.
- Cover mixture with a towel and set aside ~10 mins to allow these shy little yeastes to reproduce in private.
- Make a decision already: While the yeast is doing its thing, a critical decision in your journey is required. If you want that old school texture Mom’s bread had, you have to mix by hand. FYI: its fun to get your hands all full of flour and sticky dough so get the kids to help out. If want a more dense bread and enjoy modern convenience, go ahead and use that overpriced Kitchenaid whose purchase you need to justify.
- Hand Mixing:
- Pour yeast mixture into a large bowl.
- Stir in eggs and shortening.
- Add flour in two parts, first with a large spoon stirring between each addition. When the dough becomes too thick to stir, use your hands to mix. It’s a good idea to tell one of your kids to put their electronics down long enough to help you add flour cause your hands are too sticky.
- Knead: Kneading is a crucial part of bread making, not only does it help insure consistent texture, it activates the flour gluten developing a smooth elasticity. Scrap the dough from the bowl onto a floured table and summon your inner Babushka to work your magic. Knead until the dough is smooth and elastic. I know you never paid attention to your Mom slaving away in the kitchen, but kneading needs a good 5-10 minutes depending on your upper body strength.
- Using Mixer:
- Pour all the ingredients into mixing bowl.
- Use dough hook at speed 1 until all the ingredients are combined.
- Increase to speed 4, for ~4 mins to knead.
- Hand Mixing:
- First proof: Now you need (no pun intended) to let dough rest. Place dough into a greased bowl flipping it over multiple times. Cover with plastic film and let rise until it doubles, ~2 hrs. If you have a proofing oven, you need to admit you’re spoiled. If you don’t, put the dough in unused oven or non-drafty place. Put a cloth over the bowl to block out light.
- Second proof: Punch down dough and flip over in the bowl. You don’t want to be too aggressive, just push out the gas that’s built up. That means try not thinking about how that snippety store clerk reacted when you had to audacity to ask for fresh cake yeast. Raisin time: If you’re going to add raisins, which I never do, divide the dough into three equal portions and work a third of the raisins into each portion. You can now proceed with either an immediate or delayed finish.
- Immediate Finish: Let dough rise 1 hr covered with film and a towel.
- The reason for the film is so you don’t contaminate your dough with wild yeast.
- Delayed Finish: Cover with film and place in fridge for up to 12 hrs (or until ready to finish).
- Immediate Finish: Let dough rise 1 hr covered with film and a towel.
- Third proof: Divide dough into portions based on how you intend to bake it
- Pan Baked: Divide dough to match your baking pans. Grease the pans with butter, put dough in the pans, and let rise ~1 hr.
- I usually double this recipe and use 4-5 pans so I guess two pans per recipe is about right.
- Artisan Baked: Shape dough into two separate half-spheres about half the size and place on a paper-lined baking tray.
- Braided: Divide dough in three equal sections and roll out into a long rope. Braid the three ropes into a single loaf and place on paper-lined baking tray.
- Pan Baked: Divide dough to match your baking pans. Grease the pans with butter, put dough in the pans, and let rise ~1 hr.
- Preheat: Twenty minutes before the final proof is complete, preheat oven to 350 F.
- Mom’s kitchen never had fancy gizmos like convection fans so we are baking on conventional oven but reduce temp 25% if using a convection oven.
- Bake bread ~45 mins until golden brown on top. Your dough will rise beyond the top of your pan a good three to four inches, so make sure your oven racks have proper clearance.
- Cool: Let loaves rest on cooling rack while you contemplate which loaf will be scarified for the aforementioned warm bread and jam extravaganza.
If you got this far and it’s before 2am on Easter morning, you’re doing better than the rest of us. And, now your oven’s free to start the Lamb Cake.

Comments are closed